Showing posts with label Damask Designs. Show all posts

Friday, February 25, 2011

Papertrey Ink Blog Hop Sensational Scallops plus Color Throwdown!

Happy friday!  Today is Papertrey Ink's Blog hop featuring sensational scallops!  It has been a loooong time since I was able to participate in in a blog hop with PTI and almost equally as long since I've played with the gals over at the Color Throwdown!


Here's what I came up with....
So where are the scallops you ask???

I decided to use a scalloped circle die by Spellbinders to create a felt rose flower.

After die cutting the scalloped circle, I spiral cut the circle using a waving and random cut.

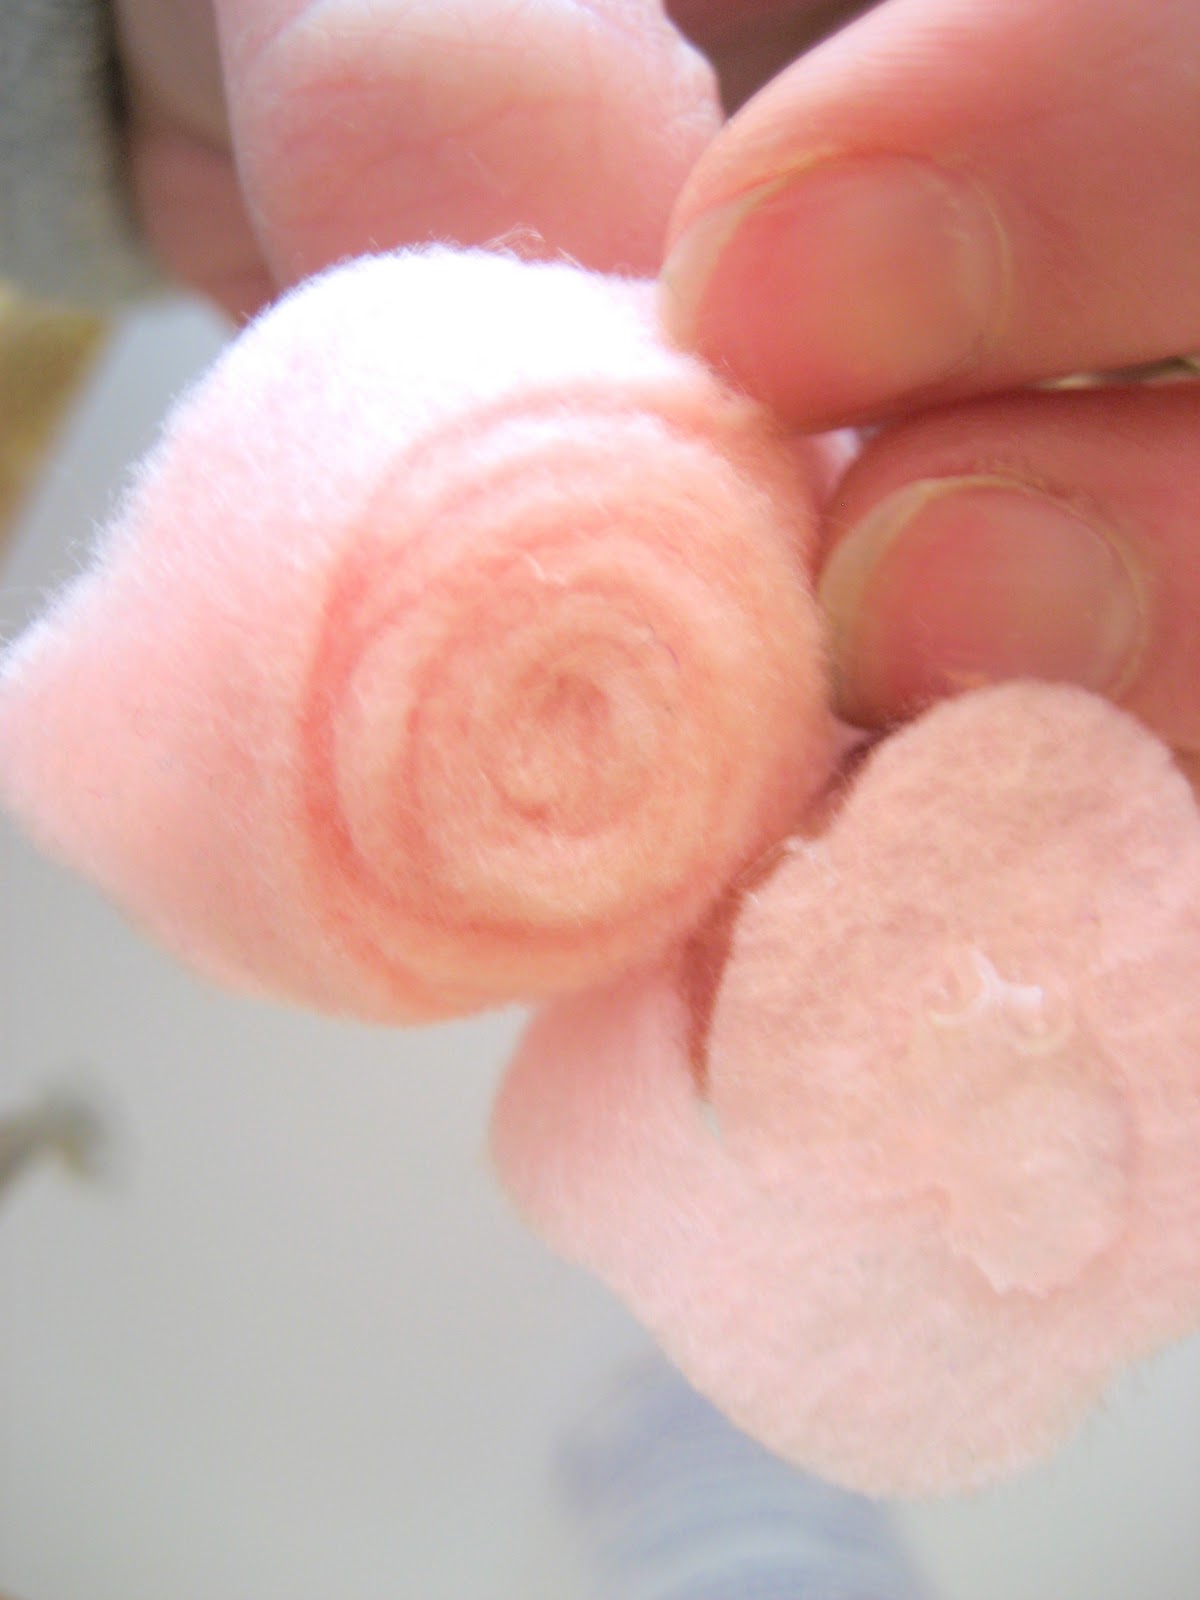
I started by rolling the outside edge of the spiral upon itself in order to build the flower from the inside out.  Once nearing the center, I applied Fabri-tac and finished rolling the flower all the way to the end.

This is the bottom of the rolled flower ready to be capped with the remaining circle of attached felt.

The bottom....

Once complete there is a nice dimension to the flower.  The height depends on how thick or thin you cut your spiral in the beginning.

I adorned the flower center with yellow sharpie colored Want2Scrap white pearls and added some pearl beaded trim I had in my stash which extends off the edge of the card.

Wow!  Check out all the different textures!  I love the contrasts and compliments in the ingredients of this card.  Especially the GORGEOUS die cut from Spellbinders Fancy Tag 2 set!  I would like to say thank you very much Spellbinders for your gorgeous products and I look forward to pairing up Nestability dies with Want2Scrap custom bling starting April 1!

So thank you so much for stopping by my blog today!  If this is your first time by I wish you a hearty "Hello" and for those returning, "nice to see you again"!  Have a great friday, friends, and I'll be back later tp share the latest challenge from the Just Us Girls DT tomorrow!

Supplies:
Stamps: Papertrey Ink
Paper: Papertrey Ink
Ink: Stampin Up
Bling: Want2Scrap
Die Cuts: Spellbinders
Embosser: Cuttlebug
Craft supply: buttons, orange sewing thread, craft felt, twine, doily, pearl beaded trim

Photobucket 

Tuesday, May 25, 2010

Papertrey May Blog Hop Challenge + GS39

It's all about FELT tonight on the blog hop with Papertrey Ink!  I love felt!  It's a very forgiving fabric and it's easy to use.  Tonight I'm using it to create my own felt embellishment inspired by this cute DP from October Afternoon!
The layout is inspired by the sketch over at Get Sketchy.  I turned the sketch on it's side and got to it.


I grabbed three different school oriented papers (college rule, alphabet printing practice and vintage dictionary) from around the house plus a great piece of canvas measuring tape I found at a local secondhand shop.  These were combined with the fabulous new Dotty Biscotti paper from PTI along with a sentiment from Damask Designs.  Add it all together with my handmade felt apple and I've got a pile of thank yous for my daughter's kindergarten teachers! 

Thanks so much for stopping by!  It's been forever and a day since I was able to play on blog hop night.  I'm so glad to be back!  See you all on the hop!

Photobucket

Tuesday, August 25, 2009

PTI Blog Hop {fall challenge} and Card Patterns #29

Hey friends! Just got done cleaning up a fabulous dinner for my sweetie's birthday. Whew doggies! It was sooo yummy...even yummier because my sweet MIL made it! :) I sat down to take a little blog break and realized I missed the blog hop window for Papertrey. Oh well, there was still plenty of inspiration so I figured, what the heck? and made a card!


I decided to gather additional inspiration from this card sketch from Card Patterns #29:
the sketch:
my card:
I rotated the sketch 90 degrees to the left and then went to town with some luscious fall ribbon, a vintage button, twine, gems and a couple of my favorite Papertrey products: bitty dot paper, Damask Designs and Fancy Flourish stamps.

Check out the :BLING: bLiNg Bling! I just love these golden craft gems. It reminds me of when the sun glints off of the leaves when they turn all of those golden-orange colors. OOOOooh I can't wait for fall to get here with the gorgeous bright blue days, crisp morning air and, best of all, cozy clothing and a fire or two in the woodstove. Bring on the fall!

Thanks for hopping by. I really appreciate that you share you day with me!

Supplies:
Paper: Papertrey Ink and Georgia Pacific
Stamps: Damask Designs and Fancy Flourish by Papertrey
Ink: SU!
Craft Supplies: gems, vintage button, hemp twine and ribbon


Saturday, July 18, 2009

Raspberry Suite Challenge #12 and CPS124 ... {Damask Anniversary}

NOTE: scroll down to the next post for the My Time to Create Challenge!! :)
It's a great day for a challenge! Or maybe even two! In a couple hours we are off to a surprise anniversary party. FIFTY years of wedded bliss!! Isn't that amazing? What a momentous occasion. It certainly calls for an elegant card and I reached right for the gorgeous Damask Designs by Dawn McVey for Papertrey Ink. I just love the presence the largest image in the set has as well as the elegant script font sentiments. I decided to continue to be inspired by Dawn and use the colors she chose for the most recent Raspberry Suite color challenge and also turned to the CPS cards sketch #124. This way, most of my card decisions were made and I could jump right into the fun part...stamping and assembling.

the challenges:
my project:
So I turned the sketch to a vertical orientation but otherwise, left the layout intact. This was perfect for a clean and elegant card. I relied heavily on the cream color in Dawn's color challenge so that the sprinkles of color would really shine and I wanted to highlight the two tone damask image in the center of my card. I first loaded the stamp with Pink Passion SU! ink and then rolled the edges in Purely Pomegranate SU! before stamping onto the cream cardstock. Loved it! This techniques gives the image a sort of inner light, especially IRL.

The beautiful scripted sentiment comes in the Damask Designs stamp set and to make it fit the circle punch, I first inked and stamped the "Happy" and the separately, inked and stamped the "anniversary" underneath. One of the small damask images in the set gives a subtle background detail to the sentiment when stamped in celery.

Good ol swiss dots to the rescue on the bottom panel and some pretty ribbons finish of the base of the card.
Thanks so much for stopping by today. I had better run and get ready for the party. Back later to see what everybody has done with these challenges.
Supplies:
Paper: Stampin Up! and Georgia Pacific
Stamps: Damask Designs by Dawn McVey for Papertrey Ink
Ink: Stampin Up!
Embossing folder: Cuttlebug
Ribbon: Stampin Up! and Michaels $1 bin
Punches: Stampin Up and CM
Other: craft gem

Monday, June 15, 2009

Raspberry Suite challenge #9

Hey friends! Another Raspberry Suite color challenge from the super duper Dawn McVey! These colors were perfect for a bachelorette card I wanted to make. As luck would have it, the bride's wedding colors are shades of green!

the challenge:

my card:
This cutie is the "mommy"on the cricut new arrival cartridge. She's been hand trimmed and I also made her some long and luscious locks and a wine glass....as the bride has requested a wine country day via limo.
As you can see, I have turned to my old friend, the Swiss Dots embosser. This time I tried double embossing because more of a great thing is better! ;) Also, the sentiment was created using two different sentiment stamps in Dawn's Damask Designs set. Isn't that font gorgeous??
Thanks for stopping by! I truly appreciate that you came for a visit! :)

Supplies:
Cardstock: bazzill
Cartridge: Cricut New Arrival
Stamps: Damask Designs by Dawn McVey
Ink: SU!
Embossers: Cuttlebug

Punch: fiskars
Other: craft gem

Friday, May 1, 2009

mytimess32 and bonus birthday card ...and blog candy giveaway

Happy saturday! Saturdays are the best since it's time for a new My Time to Create challenge with the Fabulous Lauren Meader! Check out the sketch challenge and bonus birthday challenge here and then carve out some time to get crafty!

The challenge team has been cooking up some challenge goodness for you...see the peaks above! I have listed their names on my sidebar under the My Time clock blinkie. Check out the links for more sketch inspiration from Lauren Meader, Lisa, Odette, Jennifer, Pam, Tracey, Kristen, Dawn Easton, Kendra, MacKenzie Bruckler, Maria Levine, Tamara Harder and me, Dana Gustafson...no clicking neccessary for me, just scroll down ----> :)
Lauren
Dawn
MacKenzie
Maria
Kendra
Kristen
Tracey
Pam
Jennifer
Odette
Lisa
Tamara

The sketch .... head over to Lauren's blog to post YOUR creation on the Mr Linky :)

And my card....ain't life grand? I have meaning to ink up this amazing chandelier from SU! for a while now but just didn't have the "right" plan for it. Along came Lauren's sketch and Dawn McVey's Damask Designs and I was off to the ball! :) I was going for a sort of vintage grandma's dining room meets the grand ball sort of thing. The damask image was stamped in light pink to create the PERFECT "wall paper" for my chandelier. I also stamped the Fleur di lis type image in gray over my new fave cardstock, Aqua Mist from PTI. The diamond print on charcoal is an embossing plate from SU!. More on that section in a minute.

The chandelier was the perfect palette for bling so it received mini gems on the bottom crystals and in the middle area. A scallop lace punch finished this panel off.

The ain't life grand sentiment, another LOVE in this set, just barely fits on the SU! label punch..this too called for a little bling.

And back to the charcoal panel of cardstock. I first ran it through the SU! embossing plate and then rubbed a versamark pad over the top to really bring out the pattern of the embossing. It's quite dapper in real life! I completed that panel with the aqua mist vintage buttons from PTI (LOVE!) and more bling to make them shine! This panel reminds me of a shirt front or a tux vest..something like that!


And next up...a happy birthday and SWEET WISHES to my new blogging friend, Lauren Meader! Her birthday is May 3rd and, girlie, this virtual bday card is for YOU! I hope you like rainbow sherbet!

This card uses the totally adorable sweet chocolate set from My Cute Stamps! There are a ton of images in this set, here I chose to go with the ice cream cone, chocolate chip and the sweet wishes sentiment. I started by sponging the pink, orange and lime inks onto white cardstock and then stamping with the ice cream stamp over the top. Then, stamped the image again on kraft cs for the cone. I detail cut both pieces out and adhered them to another piece of kraft cardstock. The icecream needed some shimmer so it is loaded with fine clear glitter and then popped on foam tape. Again, I used the diamond pattern embossing plate from SU! and cut out the oval and scallop oval with Nestabilities.

The chip and sentiment were stamped on orange cardstock I "frosted" a bit with white ink and more clear glitter. The line of dots is also stamped from a PTI set and I added the white dots around the sentiment with a sharpie poster paint pen...looks like sprinkles everywhere! This shot also illustrates the fun dimension the ribbon and chipboard button add.

A close up of the shine on the ice cream...the clear glitter is just enough to make it glisten. Looks good enough to eat!


OK, now on to the blog candy.... I will be drawing a name from the entries on the post from Tuesday for a gift certificate for a My Timeless Template designed by Lauren. Now is your final chance to enter your comment on that post! You have until 6pm PST today to comment. I will draw a name and post the winner tonight so check back to see if you are the winner! Don't miss out on this!


OK, that's it for now! I hope you've had a little fun with me today....have a good one friends!

Supplies:

Ain't life Grand
Cardstock: PTI, bazzill
Stamps: PTI, SU
Ink: Pallette and SU!
punch: Martha Stewert and SU!
Embossing plate: SU!
Other: ribbon, gems, and buttons from PTI

Sweet Wishes!
Cardstock: PTI
Patterned Paper: KI Memories
Stamps: My Cute Stamps and PTI (line of orange dots)
Ink: pallette and SU!
Punch: su! and cm
dies: Nestabilities by Spellbinders
chipboard flower: Colorbok
Other: glitter, hemp twine, ribbon ($1 michaels), sharpie poster paint white pen

Tuesday, April 21, 2009

Hey COACH, what do you think of this purse?

Happy tuesday friends! Today's post is all about a special friend and the gift box that turned into a purse. Do you think COACH would like a paper purse designer? Hey COACH, I'm available *wink*

My very good friend and partner in craft had a birthday a little over a week ago. Elise is an honest to goodness artist of many mediums, a wonderful mom, a responsible steward of many critters on the family ranch, a true friend to those around her and well I could go on but she's gonna totally be blushing at my gushing already! :) If you want to check her out, you can find her at Mamacow Creations. I encourage you to visit her :)

From this angle, you can see a tiny bit of that freebie jewelry department box poking out. I started with the idea to decorate the box and before I knew it, I was sketching out a template, measuring and cutting! Pretty fun! The lavender moon cardstock was custom stamped by me using Papertrey Ink's Guidelines, Guidelines 2 and Damask Designs stamp sets. All of the houndstooth embossing on the chocolate cardstock is from a Cuttlebug A2 embosser. Lovin it!

And what purse is complete without a handle? This one is simply decorated using satin ribbon and Fabric tac for adhesive. I adhered strips of lavender moon paper to the edges of the box to dress it up a little.

A close up of the vintage look a like button and silk flower. The buttons are in a nice sized bag at Michaels and look very realistic.

Here is the purse opened up. The closure is a thin but STRONG magnet by Basic Grey on the underside of the half circle flap. These babies are the best at holding things together. A simple piece of chocolate bitty dot paper from PTI to cover the top of the box.

More chocolate paper to decorate and serve as a hinge to the box. I had to cut away the backside of the lid in order to make it hinge up like this. The bracelet is wired to a piece of lavender moon cardstock.

The teeny little card to match the purse uses mostly the same materials and adding in a border punch from SU! and the Sizzix daisy die. More hand stitching with embroidery floss.

This shows the flower dimension and the coordinating stamp inside the card.

On the centers of these stamped images on both the purse and the card are liquid pearls. Love that stuff!
And not to be forgotten...the backside of the purse has cute details too.
Thanks for stopping by! I love fun gift presentation and would love to see if you have a project link to share. Please leave it in the comments so I can come and be inspired by you :)
Supplies:
Cardstock: Papertrey Ink Lavendar Moon and Dark Chocolate
Patterned Paper: PApertrey Ink Bitty Dots
Stamps: Papertrey Ink Guidelines, Guidelines 2, and Damask Designs
Ink: SU! Chocolate CHip
Embosser: Cuttlebug Houndstooth
Magnet: Basic Grey
Daisy Die: Sizzix
Border Punch: SU!
Other: ribbon, buttons, and embroidery floss