Showing posts with label hybrid. Show all posts

Wednesday, September 26, 2012

Vintage Pumpkin ATC

 
Join me over at the Want2Scrap blog today to check out an ATC that is a little fall y'all!

Photobucket
Want2Scrap Products:

Cross-Promotional Products:
3D Crystal Effects from Sakura Hobby Craft
Beacon Adhesives 3-in-1 craft glue
Other
Ribbon
Printable vintage label from Graphics Fairy blog
Bronze Stickles from Ranger
Photobucket

Friday, December 2, 2011

Just Us Girls #113 sketch....jolly ol St Nicholas


Hey JUGs fans!  Time for some sketch fun hostessed by our darling Elise!
This sketch is an easy winner...perfectly balanced plus a signature Elise move with the little tab on the right.  I can't wait to see what everyone does with this versatile sketch.  For me....I had to throw down a little Santa goodness...


This fab Santa image if a Dover clip art that I printed with good intentions LAST Christmas!  doh!  But hey, he's still as inspiring as ever and I was able to pair him up with Papertrey ink DP's, CTMH ribbon, plus some trinkets from my stash...wired evergreen, golden Christmas sprig and my own handmade "bauble" using vintage pearls and jewelry maker's head pins (color me *inspired* by sir Tim Holtz and his 12 Tags of Christmas!)

I was able to able to customize the head pins to link these pearls together....ohhhhh myyyyy, I see a new habit taking shape!  I need more jewelry findings like PRONTO!
Be sure and check out the awesome Just Us Girls designers and leave these hard working creatives a little love OK?  I know they will appreciate it. 
and our ultra fabulous super talented guest DT, Lenet!

Thanks SO much for spending some time with me today!  I appreciate it so very much. 

Photobucket
Paper: Papertrey Ink
Santa Image: Dover Publications
Stamps: Tim Holtz
Dies: Spellbinders and Grand Calibur machine
Ribbon: CTMH
Ink: colorbox and Stampin UP!
Craft Supply: head pins, pearls, evergreen trim and holiday pick

Photobucket

Friday, August 19, 2011

Just Us Girls #98..color time!


It's color week, darlings!   Just Us Girls are challenging you to an eye popping color scheme from our dear darling , Elise!  Join us won't you?

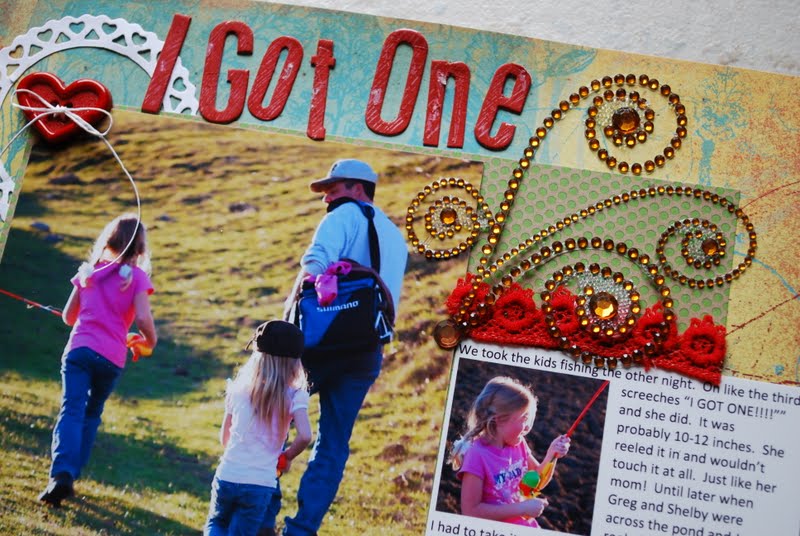
I went totally scrap-ular on this one a it was the perfect color set to get some photos that have been milling about my desk for far too long, down on paper with the memories sprinkled in between them using Word and photos from our day fishing at the family ranch...

I am powerless to the enchantment of my two girls trailing after their daddy in the outdoors.  I could snap pictures of their special relationship all day long! This particular day was a rare sunny JANUARY day just right for fishing...wait, huh!??  OK, even in California we don't expect 80 degree days or good fishing in January but lucky for us, we hit a golden day.


This is one of my favorite techniques when I have a story to tell and lots of pictures to share.  Microsoft Word does the trick interspersing your photos throughout a bunch of journaling.  If you haven't tried this before, play around with the "wrap" function when inserting photos into text.  The results are very cool I think.


I used some pretty new swirls from Want2Scrap and took advantage of the space in between the bling to offload some long hoarded microbeads.  I will be chasing these around the craft room for weeks now!


More bling and buttons and bits of goodies to finish off my page. FINALLY! These pictures can be put to bed and I feel great about that!


Check out the Just Us Girls design team for more color inspiration!

So glad you could stop by.  Have a great one!
Photobucket
Paper: Papertrey and The Stack
Bling: Want2Scrap
Dies: Spellbinders and Papertrey
Chipboard: Heidi Swapp
Other craft supply: tickets, trim, buttons, acrylic paint
Photobucket

Thursday, March 31, 2011

Make it monday ink blending...It's a MAN! {card}


Hey friends!  This card is a quickie using the ink blending technique showcased over at Papertrey Ink this week.  I used a great digital image from Cathe Holden at JustSomethingIMade.  Once I opened the deer and tree silhouette image in Word, I was able to crop it to size and add the sentiment "Happy Birthday to our Son"  easily by layering a text box with the font color set to white.

Before using my inking tool and dye inks to colorize the background, I sprayed a quick layer of clear spray paint to set the inkjet printer ink and stop it from smearing when I was swirling on the ink. Simple!  And such an easy way to bring depth to a nature scene.  Thanks for stopping by...no go ink something :)
Photobucket
Digi: vintage deer silhouette from Cathe Holden 
cardstock and ink: Papertrey Ink
Other: Microsoft Word 2007
Photobucket

Thursday, March 3, 2011

What's black, white and red all over?...and a FREEBIE

 You know, I can't actually remember the punch line to that old joke from childhood but I think it was a part of gross out comedy, so I'm good with having forgotten.  ;)  I wanted to quickly share my card for the Waltzingmouse Sketch Challenge 26, the Playdate Cafe 71 color splash challenge and the Shabby Tea Room 51 challenge.


I added all of these challenges together for a fun card using a button card I designed myself!  Is it just me, or are vintage button cards the latest "doily"?  I see them popping up all over and I grabbed this amazing crown image from the Graphics Fairy blog and worked up a simple button card of my own.
 I thought that you might light to use my button card too so here is the image for you to save and use if you please.  Click on the image and then save it to your computer.  If you use it, I'd love to have a link to your project in my comments to this post so I can come and see what you made.  This was so fun to make, I think I see more button card graphics in my future....
Thanks so much for visiting and spending time here today!

SUPPLIES:
Paper: DCWV
Punch: Martha Stewert
Craft supplies: buttons, floss, seed beads, lace trim, doily and vintage book print

Photobucket

Friday, February 11, 2011

Just Us Girls #71 spotlight technique...2gether 4ever!

Hey friends!  Happy saturday!  Time for a new Just us Girls Challenge...this time it is a technique challenge called "Spotlighting".  There is a great tutorial over at Splitcoast Stampers on spotlighting.  As the tutorial shows, you can achieve amazing results with rubber stamps + spotlighting.  BUT, being that valentine's day was coming up and I had this special picture in mind for my hub's valentine's card, I decided to do spotlighting with a photograph!
This photo was taken in Florence, Italy along the walk of the Arno River near Ponte Vecchio.  It is a closeup of  some of the "Love Locks" we saw.  I used Microsoft word to turn my original picture black and white for the background.  I used a second copy of the color original to digitally crop the focal point into a circle with a black outline.  I could have printed them digitally layered from Word but I felt the need to do some actual cutting with scissors plus a scallop circle mat on my focal point.  The "sentiment" is my very own chicken scratch using a red permanent marker...I wouldn't go far as a graffiti artist eh?  LOL!

 How amazing was the sky and lighting the day we discovered the beautiful Ponte Vecchio bridge? 
So back to the love locks....apparently lovers lock their locks to this chain with their names written on the side.  They proceed to declare their eternal love and then throw the key into the Arno River.
Does that story not tickle your lovey dovey bone?

I made this trip to Italy with my very dear friend but I wanted to bring home this piece of the experience to my very dear husband :)  Somehow a padlock on a chain is sooooooo romantic in the city of Florence!
Thanks so much for stopping by this week.  I hope you'll join the JUGs in our spotlighting challenge this week.  For lots of juicy inspiration, check out our guest designer, Lori, and the rest of the JUGs DT!

Photobucket

Friday, November 12, 2010

Just Us Girls Technique Challenge #59...Gatefolds Galore!

Happy Saturday!  Ready for the latest with Just Us Girls?  Our talented Kathryn has chosen Gatefold cards this week!  So get your scoring board out and let's make some gatefold cards!

Gatefold cards generally have two flaps that fold and either overlap or meet in the front of the card.  The "gate" can meet in the middle, off to the side, or, in my case, be shaped.  I chose this adorable cupcake cut file by the super fab Kelleigh Ratzlaff.!  I kept trying to make this card "cuter" but the fact is, the cut file does all the work!  Awesome!  I just added a little papercrafted frosting in the Color Cue #9 color pallette (I'm too late but I couldn't resist this color combo) and voila, card confection!

 I decided to try my hand at a handmade crepe paper flower.  I made mine simply by cutting individual petals our of crepe and then pinched the bottoms to create the petal shape before I glued it down to a circle punch that served as my flower backing.  I later added glitter to the edges using a little Scotch quick dry adhesive and martha stewert glitter.

See how cute this cuppie is?  The muffin top lifts to expose the top of the cupcake "liner paper" which I pinked to give it a real cupcake wrapper look.  The bottom striped paper panel hinges down to expose the entire inside for writing your message or stamping a cute cupcake image like I did here.

OK, ready to play "gatefold" with us?  Be sure to check out the designer examples at Just Us Girls, including our guest designer this month, Cheryl Rowley, for lots of inspo and then join us in our gatefold challenge.

On another note, I am riding high, my friends, on the creative spirit I witnessed last weekend at two classes led by Tim Holtz!

Weeeee!  What a fun creative festival it was last weekend!  Tim is an incredible teacher, inspiration and an all around cool guy to hang out with.  He and Mario ran a seamless show I tell you!  I can't wait until they come back to town for another round of creative fun....I am so there.  I am sure these ladies are too!
So glad to be sharing creative space with some of my favorite sisters in scrap and stamp and Tim Holtz last weekend!  What a fabulous day!  (and I just counted that I said the word "creative" far too many times in the last couple of sentences, but hey, what can I say, the man bleeds creativity and you just can't help but catch the fever of "I NEED to make something" and THAT is so exciting!!!  I can't wait to show you what we made but I'm still poking at my projects...so someday soon :)  In the meantime, check out Tim's blog for a classroom photo that illustrates how lucky we were to sit  front and center for the whole day (I am fourth from the front and my pals are right near).  Our theme was christmas so you could say that I am excited for the Twelve Tags festival this year, oh yeah, you could say that!  Bring it on!

Thanks so much for stopping by today!  I appreciate it so much!  Have a good one, friends!
Photobucket

Friday, August 27, 2010

Just Us Girls Template Challenge #48 and Clear and Simple Stamps!

Boo!  It's halloween over at the Just Us Girls blog this week. This week's challenge is a template challenge and we have an exciting sponsor!  Clear and Simple Stamps!  Pick your own template or a Clear & Simple Stamps freebie from their blog sidebar.  Our generous sponsor has offered a $25 gift certificate for one of our participants (randomly selected) and the chic of the week this week will receive their own "Spooky Treats" set!
This week the design team is working with a fun Clear & Simple Stamps set called Spooky Treats and I chose the Apple Basket template from Clear and Simple Stamps for my template project.
The finished Apple Basket is large enough to nestle a large homemade Pumpkin Muffin (yum!) gift or maybe some yummy Scarecrow Crunch to treat a special person to a little taste of fall.
To get my "autumn" on, I pulled bits and pieces in orange and black and purple.  This is my standard "gathering" of creative gear when I am making something but I just thought this group looked so happy together that I should share a photo of it!
I made some custom DP by stamping the CSS sentiment "sweet" and "treats" in black along with orange pumpkins and purple stars as shown above.  Below, I thought the ghost image was a perfect spot to frame a stamped out "boo" with some letter stamps from Martha Stewert.  I accented the ghost eyes with black pearl bling from Want 2 Scrap.  oooooooOH Spoooooky huh?
The chiboard frame was first painted with purple acrylic paint and then covered in purple micro glitter.  A paper pinwheel and fabric yo yo top off the tag.
Tags are so fun!  I love layering up all the bits and pieces!  Clothespinned to the gift tissue along with the adorable CSS Apple Basket is a great gift no matter what you fill it with!

Be sure and stop by the Just us Girls blogs for all of their project details, including our guest designer for August, Jo Westfoot.  Many thanks for a wonderful month Jo!  

Can't wait to see what everyone makes this week!  Thanks for stopping by!

Supplies:
Stamps: Clear and Simple Stamps, Martha Stewert
Paper: DCWV, Papertrey, vintage book print
Ink:  Stampin Up, Staz on, Papertrey
Bling: Want 2 Scrap
Craft Supply: fabric, button, glitter, paint, chipboard frame, ric rac, ribbon, fabric paint, brads, raffia, clothespin
Photobucket