Showing posts with label Kelleigh Ratzlaff templates. Show all posts

Saturday, February 25, 2012

Just Us Girls #125... buttons and ribbon and flowers, oh my!!

For my Wilson Designs release post, click here!


This week Lisa is challenging us to make a template based on 3D project and you must also incorporate ribbon, button(s) and flower(s).


This week I chose to use the super cute milk carton template from Kelleigh Ratzlaff.  Kelleigh is my go to gal for templates and I have enjoyed a good long run as a creative team member for her since spring of 2009!  I am bidding a fond adieu to my post on the creative team....it's time for me to move over for the sizzlin' new members of Kelleigh's team!  So excitedc for them as they embark on the next creative chapter with their fearless leader, Kelleigh!  Kelleigh, it's been SO great!  Thanks for finding me and taking me on the journey so far. *sniff*  Love you, girlie!


Are you ready for some challenge fun?  Check out the girls...
Be sure and stop by the Just Us Girls DT blogs for more inspiration:

and our super duper talented guest designer for February, Cheri of Stamp'n Boomer!
Thanks for coming by!

Photobucket
Template: Kelleigh Ratzlaff, cut with Cricut and SCAL
Paper: Papertrey and MME
Punch: Martha Stewart
Button: Buttons Galore and More
Ribbon: Offray
Fower: Prima


Photobucket

Tuesday, February 8, 2011

Shabby Tea Room...another "Sweet Valentine"


Hi y'all!  Back with another *sweet* valentine offering.  Another Kelleigh Ratzlaff cupcake cut file.  I was inspired by the love theme and the colors going on over at the Shabby Tea Room.
I am just loving that non traditional pop of celery green among the pinks of valentine's day!
More pretty DP from Papertrey Ink and October Afternoon along with my fave vintage sheet music for the pinwheel.  Got flair?  This card does!  American Crafts Flair button serves as the "cherry on top" of this confection!

Just had to sahre the chunky glitter close up on this one and also the scrumptious ribbon "frosting"!
Don't you love how this cut file opens in gatefold style?  Once again, I adhered the bottom flap so it would be a pocket for a scallop punched notecard.  Now the giver can write a sweet message to her valentine!

Thanks for stopping by!  Have a *sweet* day!
Photobucket

Monday, February 7, 2011

Color Cue #11...Happy Birthday

Hi there!  Back with another Kelleigh Ratzlaff cupcake card template...you're gonna see these alot!  I love them!  This project was made for the Want2Scrap CHA booth using brand new Nestabling! and I used the ColorCue #11 challenge colors from Dawn at Wplus9 stamps.  I chose kraft brown as my other neutral.

 I chose designer papers (bitty dots and dotty biscotti) from Papertrey Ink.  Also, I used the Wplus9 stamp set called Funky Flowers for the sentiment flag.  The rose diecut, frame background and pennant pieces (cut from journaling tags) are The Girls' Paperie die cuts- paper cuts.  The adhesive pearls on the rose center and the banner are Want2Scrap.

Check out the Beaded Square Nestabling in pearl!  All of those pearls are on single Nestabling square...soooo easy to apply to your project.

Thanks so much for stopping by today. 

Photobucket

Friday, February 4, 2011

Just Us Girls + Want2Scrap = JUGS #70 Sketch!


Happy Saturday!  I am THRILLED to bring you the Just Us Girls challenge this week...we have the added excitement of a sketch sponsored by Want2Scrap

Want2Scrap manufactures their own line of bling, acrylic and chipboard albums as well as laser designs and ribbon. They have also just announced a brand new product called Nestabling...bling that is specifically designed to work with your Spellbinder Nestabilities! Want2Scrap is generously offering a $25 gift certificate to one of our randomly chosen challenge participants this week! W-O-W! Now that's shopping power!

Check out the sketch....

This sketch is to inspire you to pile it up in one corner of your project!  Doesn't matter what you pile, just as long as there are LAYERS...

I used one of my favorite card templates by Kelleigh Ratzlaff to create a *sweet* valentine for my friend's granddaughter.  My layers include a paper doily, handstamped banner tag, Want2Scrap bling swirls, satin flower, seam binding and a cute Romance Love Flair button from American Crafts to top it off.  I also outline the cupcake topper with pearl liquid fabric paint.

I love how this template opens up to display the inside.  I chose to adhere the cupcake "wrapper" on the sides and bottom so that it becomes a pocket to tuck a note or a gift card inside.  To make the "wrapper" I scored and folded a piece of Papertrey Ink dark chocolate cardstock at 1/4" intervals.  I then adhered it to the card base with liquid adhesive and let it dry.  Once dry, I could trim the wrapper to the shape of the card.  I hand trimmed the top edge in v-shapes so it looks like the real wrapper deal! :)

I added this sweet lace heart border punch from Martha Stewart crafts and topped it off with Pearl Bling from Want2Scrap!

Ready to join us?  Head on over to the Just Us Girls Blog to see inspiration by our February Guest Designer, Lori, along with Want2Scrap guest stars Mimi and Elise PLUS the JUGs girls you know and love.


Thanks so much for coming by today!
Photobucket

Friday, January 21, 2011

Just Us Girls #68....{you're sweet}


Hey friends!  Saturday and a new challenge with Just Us Girls has arrived!  This week the lovely Lisa has challenged us to make a 3-D/template project with a Love theme. 

Gotta say, I am a sucker for all the hearts and lovey dovey sentiments in the holiday aisle this time of year.  Lovey dovey schmoopsy whoopsy...yep, just LOVE it all.  For this challenge I chose to LOVE mother earth by upcycling a treat container that was just crying out to be dressed up with the colors of St Valentine's Day.
This tall aluminum canister was easily dressed up with paper doilies, an SCAL cut file lable by Kelleigh Ratzlaff called Doodle Labels and Frames as well as a scalloped edge from Scalloped Borders.   I added fun little homespun touches like a fabric heart yo-yo, seam binding trim, heart buttons and a seamstress pin to hold my punched and stamped message of "you're sweet".  I can't wait to fill this canister with treats for my sweet. 

We'd LOVE it if you joined us for this sweet challenge this week.  The Just Us Girls designers have outdone themselves again along with guest designer, Carla Suto.  THanks so much for stopping by today!
Photobucket

Monday, November 22, 2010

Getting our Attitude of Gratitude on


Hello friends!  Here in the US preparations are happening for Thanksgiving.  On a personal note, how on earth is it November 22nd, 2010 already?!!??  Anyway, I digress.  Before we pull down the boxes of Christmas decorations and I get all excited about my vintage glass ball ornament collection, I wanted to share a couple fun fall projects. 

First up is this pumpkin floral arrangement.  Inspired by piles of gorgeous pumpkins from my aunt and uncle's field, I set about to create an arrangement not only for our family table but in a form that I could teach to my daughters' 4-H arts and crafts group.  Sooooo yesterday we spent an hour pumpkin scooping, arranging and adorning these pumpkins with 11 of our closest 4-H friends. 

Here are my homegrown floral designers!  Ranging in ages from 5-15 yesterday, all 13 girls went home with gorgeous silk flower arrangements. (Although this arrangement can be done with real flowers, silk flowers with their wire stems are alot easier to handle!)  So proud of all the girls yesterday!
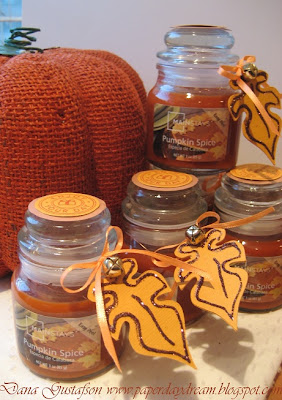
Next up is a simple gift....these would be great as a hostess gift, or in this case, I made a bag of these decorated mini jar candles (pumpkin spice...my fave scent of the season!) for a birthday gathering I attended with my aunt, cousin and friends.

I used the Autumn Leaves cut file by Kelleigh Ratzlaff.  Using her file + Cricut + SCAL I was able to cut several of the same leaf on my 6x12 inch sheet of paper.  I used Scotch Quick dry adhesive to quickly outline half of the leaves and then poured on the Martha Stewert glitter in Brownstone.
The other half of the leaves got the wire treatment!  I wanted my leaves to have a wire stem so I could use them like a floral pick from the craft store.  To do this is as simple as liquid glue + craft wire sandwiched between 2 leaf layers.

Each leaf wire was threaded with a jingle bell and a single ribbon bow.  I then curled the wire inside the jar candle and held it in place by closing the jar lid down over the wire stem to hold my leaf in place.  Simple!  I also like adding a circle punched and stamped image to the top of the jar candle.

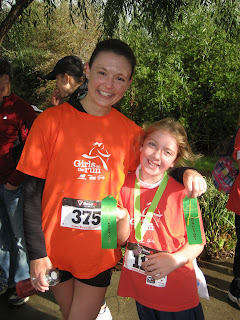
One more note on gratitude.....I am grateful for these two and all they accomplished......
Traci and Jaycee made an excellent team on saturday!  Here's my girl  finishing her first 5K race!...
You go girl!  Your mama is sooooo proud of you!

Photobucket

Thursday, November 18, 2010

Waltzingmouse Sketch 23......{Noel}

 
 Hello friends!  I am so excited to be sharing a card today for the Waltzingmouse Sketch Challenge #23!  I have been trying to play along with this group forever but I never seemed to manage it...til NOW!  Yay!  
Cute sketch huh?  So many posibilities on this one and since I don't do straight lines very well, I added lots of curves to my card today! 


I love this wintery DP from Cosmo Cricket. (Jolly by golly "Play Day").  I started with this as my card base and went to town layering on some goodness.  Vintage sheet music, vintage plastic button, SU glass glitter, ink distressed and ruffled ribbon, tea dyed seam binding

Here's a great closeup of the yummy Want 2 Scrap goodies I used.  Pink pearl bling, rhinestone swirl bling and brand new cream baby bling!  Love love LOVE!
And can I getta "uh HUH!" for the brand new Ornament Cuts from Kelleigh Ratzlaff?!!??  EEEK!  too cute! I layered and welded one of her Designer Labels over the face of this ornament for a spot for my sentiment.   I just love the flexibility of these cut files + Cricut + SCAL software( i got mine at CandaCraft)!  I popped the top layer with pop dots to give this cute ornament even more dimension.

Well that's all for today!  Thanks for joining me!
Photobucket

Friday, November 12, 2010

Just Us Girls Technique Challenge #59...Gatefolds Galore!

Happy Saturday!  Ready for the latest with Just Us Girls?  Our talented Kathryn has chosen Gatefold cards this week!  So get your scoring board out and let's make some gatefold cards!

Gatefold cards generally have two flaps that fold and either overlap or meet in the front of the card.  The "gate" can meet in the middle, off to the side, or, in my case, be shaped.  I chose this adorable cupcake cut file by the super fab Kelleigh Ratzlaff.!  I kept trying to make this card "cuter" but the fact is, the cut file does all the work!  Awesome!  I just added a little papercrafted frosting in the Color Cue #9 color pallette (I'm too late but I couldn't resist this color combo) and voila, card confection!

 I decided to try my hand at a handmade crepe paper flower.  I made mine simply by cutting individual petals our of crepe and then pinched the bottoms to create the petal shape before I glued it down to a circle punch that served as my flower backing.  I later added glitter to the edges using a little Scotch quick dry adhesive and martha stewert glitter.

See how cute this cuppie is?  The muffin top lifts to expose the top of the cupcake "liner paper" which I pinked to give it a real cupcake wrapper look.  The bottom striped paper panel hinges down to expose the entire inside for writing your message or stamping a cute cupcake image like I did here.

OK, ready to play "gatefold" with us?  Be sure to check out the designer examples at Just Us Girls, including our guest designer this month, Cheryl Rowley, for lots of inspo and then join us in our gatefold challenge.

On another note, I am riding high, my friends, on the creative spirit I witnessed last weekend at two classes led by Tim Holtz!

Weeeee!  What a fun creative festival it was last weekend!  Tim is an incredible teacher, inspiration and an all around cool guy to hang out with.  He and Mario ran a seamless show I tell you!  I can't wait until they come back to town for another round of creative fun....I am so there.  I am sure these ladies are too!
So glad to be sharing creative space with some of my favorite sisters in scrap and stamp and Tim Holtz last weekend!  What a fabulous day!  (and I just counted that I said the word "creative" far too many times in the last couple of sentences, but hey, what can I say, the man bleeds creativity and you just can't help but catch the fever of "I NEED to make something" and THAT is so exciting!!!  I can't wait to show you what we made but I'm still poking at my projects...so someday soon :)  In the meantime, check out Tim's blog for a classroom photo that illustrates how lucky we were to sit  front and center for the whole day (I am fourth from the front and my pals are right near).  Our theme was christmas so you could say that I am excited for the Twelve Tags festival this year, oh yeah, you could say that!  Bring it on!

Thanks so much for stopping by today!  I appreciate it so much!  Have a good one, friends!
Photobucket

Tuesday, August 24, 2010

EBTKS #21, PDCC #43 and STR #24...{congratulations}

Hello!  A quick post to bring you a card for three challenges today.  I generally don't try to combine challenges but these all presented themselves to me today when I was making a card I needed for an upcoming wedding.  The perfect storm if you will..
The play date cafe has some positively breezy colors this week and with the 100 plus weather today, I'll take breezy!
The ladies over at Everything but the Kitchen Sink called up some sketch creativity based on a front loading clothes washer!  a little something I know alot about as laundry never seems to stop its endless march.  LOL!
And the lovely Shabby Tea Room gals have challenged us to use metal this week.

Ahhhhhh!  Breezy!  See what I mean?  Also, these colors were perfect for the "something blue"  I like to include on wedding cards.  I do love a good tradition!  :)  The sketch allowed me to use my FAVORITE thing right now...a paper doily!  What is it about these things?  I just adore them! 
The up close and personal shows off the hand made flower using a cut file by Kelleigh Ratzlaff for the large focal point flower.  I used white cardstock spritzed with seafoam shimmerz.  I dressed up the center of this flower and two other Prima flowers with a regular office supply brass brad (my metal for the Tea Room girls) topped with a pearl bling from Want 2 Scrap.  From drab to FAB!  I now LOVE my brass brads for flower centers!  Thanks to adhesive pearls!  The pearl swirl is also Want 2 Scrap.  The flower grouping is finished with two pearl topped corsage pins...come to think of it, this ribbon, flower, pin combo reminds me of a pin-on corsage!   I knew those floral design classes would come in handy one day (hi mom!).

Thanks so much for stopping by today.  I hope your day is cool and calm!  OH!  And don't forget to comment on this post if you'd like a chance to win some BLOOMERS!
Photobucket