Showing posts with label Love SOngs. Show all posts

Friday, January 8, 2010

Just Us Girls #15 {stitching}...how sweet it is!


How sweet it is!!  Life, and challenges with Just Us Girls, are just as *sweet* as can be!  This week the DT girl with "be sweet" as her signature tag line, Mona Pendleton, is hosting the technique challenge at Just Us Girls!  This week it is STITCHING!  Yay!  I *heart* stitching!


I also incorporated the colors from the girls at Color Throwdown.  See here for challenge number 74!  I love their color combos and it's been awhile since I have gotten to play with them.  But this week, I heard the great news that my friend and fellow JUGs girl, Kristin Bueter, is the newest addition to the Throwdown team!  yay for Kristin! I am SO excited for her!!

my project:

OK, it's all about the STITCHING here!  You all know I do love me a machine stitch or two but this week I wanted to let the spotlight fall on some juicy handstitching instead!  I just love the texture the embroidery floss stitching gives my focal point heart.


Before I put needle and floss to my paper, I pre pierced the sewing holes with an awl.  I made a pattern for this by drawing 3 nested hearts on a piece of scratch paper and temporarily adhering it to my kraft cardstock.  After pre piercing, I handstiched with the embroidery floss. You'll want to use a nice heavy cardstock for this kind of sewing so you don't tear your project (I used Papertrey Ink cs).


Check out that crocheted orange flower behind the button!  I WISH I knew how to make those but alas, I don't.  Good thing I have my sweet and talented friend, Kristin Bueter!  She sent me a handful of these pretty blossoms.  Isn't she a doll?  I gotta learn how to do this!  Thanks girl!

Ok, ready to check out the rest of the team?  If you haven't already, go check out all the juicy details on their blogs.  We welcome Gabby Arriaza back again this week as our guest designer too! 

Kristin Bueter
Gabby Arriaza Guest Designer

Thanks so much for stopping by! I really appreciate it!  Have a great day!

Supplies:
Paper: Papertrey Ink
Stamps: Papertrey Ink
Crochet flower: Kristin Bueter
Craft supply: embroidery floss, ribbon, button
Photobucket

Friday, May 29, 2009

Welcome to my Cupcakery.....My Time Technique Challenge and Stampin Out Alzheimer's Exclusive

Well happy weekend everyone! It's time for another challenge from Lauren Meader and the My Time to Create design team! And if you've been following along with me this week, you know that the Stampin Out Alzheimer's week of fundraising, challenges and prizes is wrapping up this sunday, May 31st. You can still get in on the fun by donating a mere $5 to have access to freebie downloads, challenges and a great community (see the donation box on the right). One of the amazing freebies is the totally cute *SOA exclusive* CUPCAKE template I am using today designed by the generous and talented Kellieh Ratzlaff at the Digichick. Check her out!


my project:
The technique challenge this week from Lauren is dry embossed vellum with coloring from the back side for highlights. This is actually very cool and looks like white powder embossing without the mess. I chose to use the technique on the hearts and dots "sprinkles" on my cupcake.
I first stamped my hearts and dots on the backside of the vellum with versamark ink. I then traced the stamped shapes with a stylus and a foam mat underneath. Then colored in the shapes, again from the back side. The light shining through this 3-D shape really illuminates the images. I also couldn't resist a layer of spray adhesive and fine clear glitter from Martha Stewart on the vellum. I do love my sparkle!
The top is held closed with a corsage pin threaded with beads. The green bead was dyed with Tim Holtz Alcohol ink in celery. The wrapper is two pieces of 2" x 12" paper from K&Co that has been scored with a Scor Pal at 1/4" intervals and accordian folded. This was adhered with liquid glue around the template cupcake. I also trimmed the top edge of the wrapper with pinking shears.
A look down inside the cupcake wrapper....

This cupcake is roughly the size of a gourmet large cupcake so plenty of room inside to fill with treats! And, thanks to Grandma D for the gorgeous hunk of vintage glass. The stand is actually the base to a large punch bowl.

Want more dry embossing? Check out these projects from the My time to create team! Can't wait to see what you make. See you soon!

Lauren
Alicia
Maria
Kristen
Tracey
Pam
Tamara
MacKenzie

Thanks so much for stopping by. I love hearing from you!


Supplies:
template: Kelleigh Ratzlaff at the Digichick
vellum
paper: K&Co
pens: Zig scroll and brush
versamark ink
stamps: Papertrey Ink
glitter: Martha Stewert
punch: Stampin Up scallop circle
Tools: stylus, scor pal, fabric tac, scotch liquid adhesive, pinking sheers
alcohol ink: tim holtz in celery
other: ribbon, corsage pin, beads, green twistel

Wednesday, March 18, 2009

A happy birthday wish

This happy birthday card was made especially for Karen! Fellow retreater, fellow PTI lover and fellow blogger here at Time Crafted. I hope you go visit her blog...she's been up to some yummy goodness with cupcake stamps and crystal effects! My friend Karen is such a sweetie, I thought that these sweet treat ice cream cones would be just the thing to help celebrate her February birthday!It was super fun to combine some excellent stamps sets, ribbon and cardstock from Papertrey Ink in colors that remind me of rainbow sherbet. I always loved getting that when I was a kid. And of course, a little glitter just so Karen would know it was from me ;)

And a close up shot of the ribbon tied with a button and some twistel trick. This is a new technique to me and I just love the way it looks. Supplies:
Stamps: Papertrey Ink Guidelines, Around and About Sentiments, and Love Songs
Paper: Papertrey Ink Raspberry Fizz and lemon tart, CM Orange
Ribbon: Papertrey Ink saddle stitch raspberry fizz
Ink: SU!
Scallop Punch Martha Stewert
Other: Stickles by ranger, button, twistel, zig writer

Saturday, February 14, 2009

Happy valentines day ---I wuv you! woof woof!

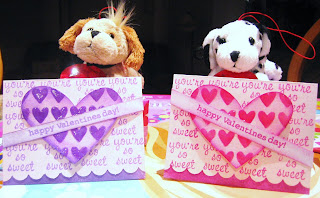
Just one last valentines day offering. A late night wrapping and card making session for my girls last night. The tiny dogs, when squeezed, say I wuv you, woof woof! Sure to make 2 little girls day a little sillier...if that's even possible. :) The cards are stamped with a studio G acrylic stamp that says "you're so sweet". The "happy valentines day" sentiment is from Papertrey ink...the love songs set. The scallop punch is SU! The die cut heart is from the doodlecharms cricut cartridge. I dressed it up with the tiny heart mask I made by cutting the heart paper clip detail from fabulous finds over and over again. It made a perfect mask for making rows and rows of inked hearts. And just for fun and because I like to torture myself with glue drying time ;), I put crystal effects over the top of each little heart. Made them look good enough to eat!


Wednesday, February 4, 2009

It's in the bag!

Hi all! Just a little treat bag dress up to share. This is what my girls will be making to take the valentine treats to their friends this year. Well, they'll be doing their own stamping and color choices but here is my version. The treats are contained in the clear lollipop bags by Wilton. Any bag 2x3 inches or so would work. To dress up the clear bags, I made up a wrapper with a matchbook style closure that is stamped with the adorable images from Papertrey Ink. This is the Love Songs set. LOVE it! To start, I cut a 3x10.5 strip of white paper. Score it a 4 inches 5 1/2 inches and 9 3/4. The first four inch panel will be the front of your packaging so you will want to make sure anything stamped or added here will be face up once it is closed. The scallop circle punch from SU! makes a great window and if you punch from the side of your cardstock, it reaches the horizontal center once you feel the carstock edge stop the punch from going any farther in. Convenient! and a nice surprise :) Stamp and ink you front panel. Fold and staple the top flap and stamp the Happy Valentines Day sentmient. I added some punched paper scallop (punch by Martha Stewert) to the edge of the flap just for fun but it's not needed to hold the wrapper closed. Finally I stamped the circle/heart topper tag and adhered it over the staples for a more finished look.
Fill your treat bag with candies and tape it to the inside of your wrapper up under the top flap. Finish folding the wrapper at the previously scored marks so your treat can stand on it's own and tuck the front panel under the flap. Ta da! Totally cute and handmade wrappers!!! My kids love to stamp (ages 8 and 5) and they can't wait to get started on their own version of these this weekend. Happy hearts day!!!


Sunday, January 25, 2009

Happy January PTI Blog Hop


Happy blog hop everyone! Thanks for visiting my blog :)

For the birthday card theme I have come up with a couple things. First up the cupcake card!


Using stamps from the Love Songs set, I created a cupcake with the stack of heart cookies stamp and hand drawing the cupcake "wrapper" with a Zig writer. The candles are also from Love songs and I think is meant to be the spoon handle that pokes out of the ice cream. Also from PTI, the raspberry fizz paper. The punched scallop edge is from Martha Stewart, the white pen is a Signo gel pen and the cute orange ribbon is from the $1 bin at Michaels, and of course a little Stickles to the hearts, the flames and the wrapper.


The next two cards are cakes made from ribbon scraps. I can't bear to toss any piece of ribbon unless it is sooo small. I keep a clear zip bag full of ribbon pieces too small to wrap around my ribbon card storage system and from time to time, will pull them out and make "cakes".


The above card uses PTI Ocean Tides cardstock and the Guidelines set for the stamped yellow background. The cake plate is from a SU! set and the celebrate stamp is a studio G stamp. Silver glitter dresses this cake up a little.

This card uses the PTI Raspberry Fizz cardstock, Love Songs cookie tray as a cake plate, and the polka dot basics for the background. THe MS scallop punch again, redline tape to hold the strip of orange glitter, prima paper flower and a clear gem that has been colored with alcohol inks to take on an orangey hue. In case anyone is wondering, I use either the Scotch quick dry glue or Aleene's tacky glue to adhere the ribbons to a separate piece of cardstock and then I cut it out in cake form to even up the sides of the cake. All ink is SU! classic.
With all of these cute cards, how about a way to dress up a gift card? I thought Lauren's Purse-onality Clutch would be a great way to make a gift card more exciting. I based my packaging on the cute flower themed gift card I got at target.
The flowers are peeking through a window I cut in the front of Lauren's template and covered with the acetate I peeled from a new PTI stamp set. Never waste good acetate I say ;)

Here is the template before adhering the sides. I stamped the sides with different patterns using a sticky note to mask the areas that were not to be stamped. I used Polka Dot Basics and Guidelines and a little sun mini stamp from my collection. The stamped flowers to the right of the window are the motifs from Guidelines and the flower stems are the balloon string from Love Songs. I LOVED the flowers I got from turning the motif a little and using light/dark shades of ink! The yellow cardstock scalloped edge was made using the SU! scallop punch. I also ran my ink pad down the edge of the flap and purse sides to mess it up a little.
Above is a shot into the purse. I attached a cardstock tab and wrote pull on it so the recipient wouldn't miss that the gift card was meant to be taken out and used! Also tucked a mini emery board and mini nail polish trio from the target dollar area.

Some gold glitter to dress things up, a scallop punch tag from SU! and also large yellow eyelets on either side of the box to put the ribbon handle through. The butterfly punches are from MS and I colored some details on them with a white Signo pen and then put iridescent stickles over the top. Very cool effect IRL. Finally, a little reminder of an old tip but still a useful one...my ribbon for the handle was a light baby pink but I easily fixed that by running this dollar section ribbon over my dye ink pad.

Well that's it for today. Thanks for visiting my birthday blog hop post!!